Contents
Target Outcome
This specification targets at volumetric reconstruction of a tissue of interest, specifically the definition of the boundaries of the tissue as an image volume.
Protocols
Required Infrastructure
Slicer is a free, open source software package for visualization and image analysis (BSD-style open source license, see http://www.slicer.org).
Input
Set(s) of MRI in DICOM format. For more details, see Magnetic Resonance Imaging.
Segmentation Procedures
Segmentation Setup
- Open Slicer and load DICOM to be segmented
From the Modules drop-down menu, select Editor
- When multiple MRI sets are loaded, in most cases the desired MRI to be segmented should be the same as the Master Volume. It is also possible to do segmentation on a different MRI than the Master Volume. For example, different MRIs can be displayed in different windows, e.g. those that are ligament specific and cartilage specific. When linked, Slicer uses interpolation for coupled viewing of the image sets that are already spatially aligned. For segmentation, one can use one image set as the master volume but segment in the other allowing high resolution segmentation volume from images with lower resolution.
If it is the first time entering Editor Module, click OK to select the default GenericAnatomyColors to create a new Merge Volume (i.e. label map, with the same size/resolution as the Master Volume)
If not the first time, make sure the desired label map overlayed (i.e. being edited) in the 2D slice viewers is the same as the Merge Volume.
Manual Segmentation
- Different tools are available to highlight anatomy of interest a desired label (e.g. label1):
Use the PaintEffect (under Edit Selected Label Map tab, top row of icons, 3rd icon from left) [with an appropriate/largest radius] to fill in the area using a brush.
Use the DrawEffect (under Edit Selected Label Map tab, top row of icons, 4th icon from left) to draw the boundaries of the area - freehand or by right mouse click to set the polygon corners and left click to fill in the polygon.
Use the EraseLabel (under Edit Selected Label Map tab, top row of icons, 2nd icon from left) to change the behavior of the tool, e.g. brush or pencil, to erase rather than draw.
Save segmented label map (as NifTI)
File > Save, or Save icon
- Deselect all modified/selected files in the 'File Name' field
- Select/Check the desired segmented label map volume (default type: NRRD, .nrrd)
Set the File Format to NifTI (.nii)
- Rename the label map volume as desired
Click Save
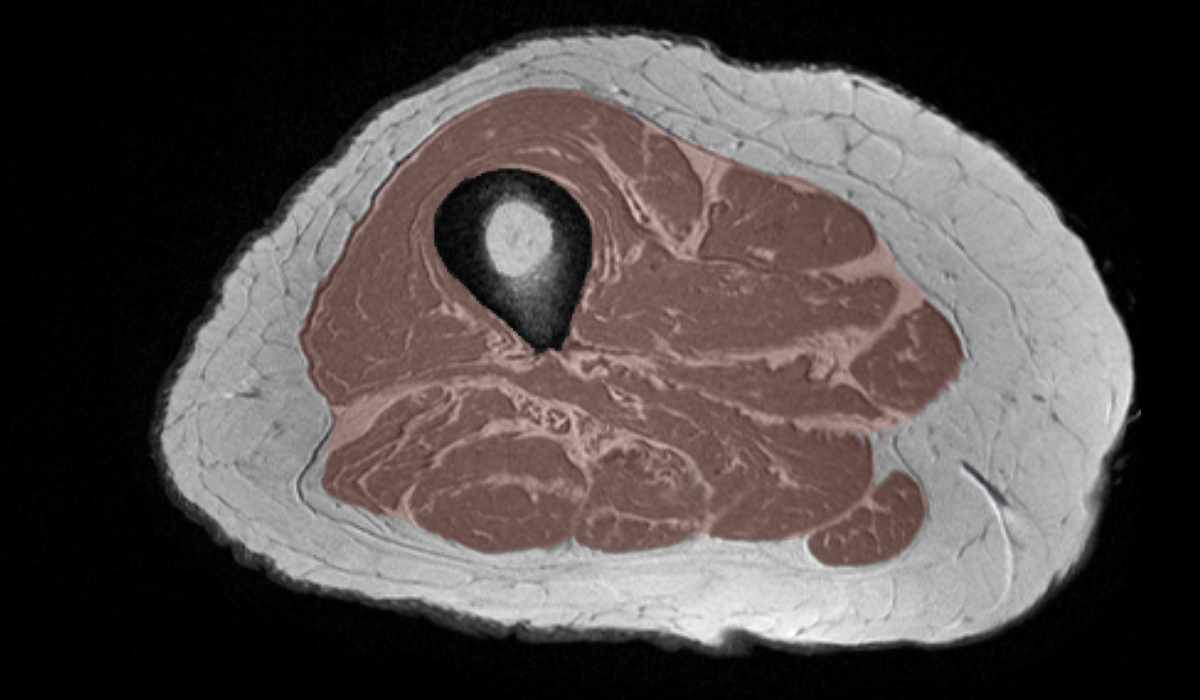
Example Manual Segmentation: Upper Leg MRI (T1)Label Map
Concerns
How do we segment multi-layer tissue structures and produce good meshable stls while simultaneously be respectful of anatomical details?
Output
Volume of tissue of interest as a binary image aligned with original MRI coordinate system (raw, without filtering and smoothing).
This binary image will be used in Geometry Generation.

